

Why a crawl space needs ventilation at all
If the foundation is uninsulated and the crawl space has no ventilation, humidity underneath the house rises quickly and turns into condensation. Moisture travels upward through the floor structure and rises from the soil. Without air movement it accumulates in the ground beneath the house, on the walls of the stem wall, and settles on floor joists and subfloor sheathing. In the warm, consistently humid conditions of a San Marcos summer, bacteria and mold reproduce rapidly, wood begins to rot, and musty odors work their way into the living spaces above.
There is a second reason that receives less attention: radon gas. Radon is a naturally occurring radioactive gas that seeps out of the soil. Without ventilation it collects in the upper part of the crawl space and gradually enters the house through cracks and gaps in the floor assembly.
Two approaches to crawl-space ventilation
The first approach is to install foundation vents — openings cut through the stem wall. Moisture is carried out by cross-ventilation when vent openings are placed on opposite walls.
The second approach is to pull air out of the crawl space through a vertical duct that exits at the roof, with makeup air supplied through floor registers in the rooms above. In this arrangement, no foundation vents are made in the stem wall at all; however, the exterior of the foundation, the stem wall, and the surrounding grade must be thoroughly insulated, and the soil inside the crawl space must be sealed with a vapor barrier.
The second solution looks cleaner from the outside and does not chill the crawl space in winter, but it requires a much larger investment. In most San Marcos homes — especially older ones built on raised foundations — the first option with foundation vents is more practical. This choice comes up in older homes in nearby Escondido as well.
Sizing the vent openings
The total vent area should be no less than 1/400 of the crawl-space floor area. For example, if the crawl space measures roughly 780 square feet, the combined opening area must be at least 780 ÷ 400 ≈ 1.95 square feet (about 280 square inches).
Each individual vent should have a minimum area of about 0.5 square feet. Rectangular openings should be no smaller than roughly 10 × 8 inches or 20 × 4 inches. Round vents should be at least 10 inches in diameter.
In practice, homeowners in San Marcos often prefer to make somewhat smaller openings and simply install more of them so that the total area still meets or exceeds the 1/400 guideline.
Where to place the vents
Foundation vents are formed about 6 to 8 inches below the top edge of the stem wall. If the stem wall is low and the opening would end up too close to the ground, a small pit — a window well — is dug in front of the vent on the outside.
Vents should be distributed evenly around the entire perimeter and, critically, placed directly across from each other on opposite walls. This is what creates effective cross-ventilation: wind enters one opening and exits through the one across from it, carrying water vapor and radon out of the crawl space.
The spacing between adjacent vents should be roughly 6 to 10 feet. If there are interior footings or stem walls that divide the crawl space into compartments, each compartment needs at least one vent opening of its own. Interior stem walls should also have openings cut through them to allow free air movement — ideally two to three times the area of the exterior vents.
Protection from rodents
Every vent opening must be covered with a screen or grille with a fine mesh. Metal screens are strongly preferred: plastic mesh is not a real obstacle for mice or rats, which can be a persistent problem in San Marcos neighborhoods near open fields and canyons.
How vents are built
Foundation vents are formed during construction of the foundation itself.
Poured-concrete stem walls
For round vents, a section of PVC or fiber-cement pipe is set into the formwork with its ends flush with the outside faces. The pipe is filled with sand and capped so that the wet concrete does not crush it. For rectangular openings, a small wooden box of the required size is nailed inside the forms and knocked out after the concrete sets.
Masonry stem walls
A brick or block is periodically cut short or a half-unit is laid in place of a full one, leaving the gap open.
Concrete-block stem walls
Standard CMU blocks with two large cores are turned sideways so that the cores become through-openings and installed in place of a regular block.
Post-and-pier foundations
When the gaps between piers are enclosed with skirting, the required number of vent openings is left in the skirting. The combined area must still equal 1/400 of the crawl-space footprint.
What to do when vents are missing
If the foundation was built without vents — or the existing ones are too small — several options are available.
Cut or drill new openings. A core drill with a diamond-tipped bit will bore cleanly through concrete without the shock loads of a hammer drill. Alternatively, many small holes can be drilled around the perimeter of the planned opening and the plug knocked out afterward.
Improve the draft. A vertical pipe can be run from an existing vent up to the roofline. The pressure difference between ground level and roof level increases the draw and removes more moisture.
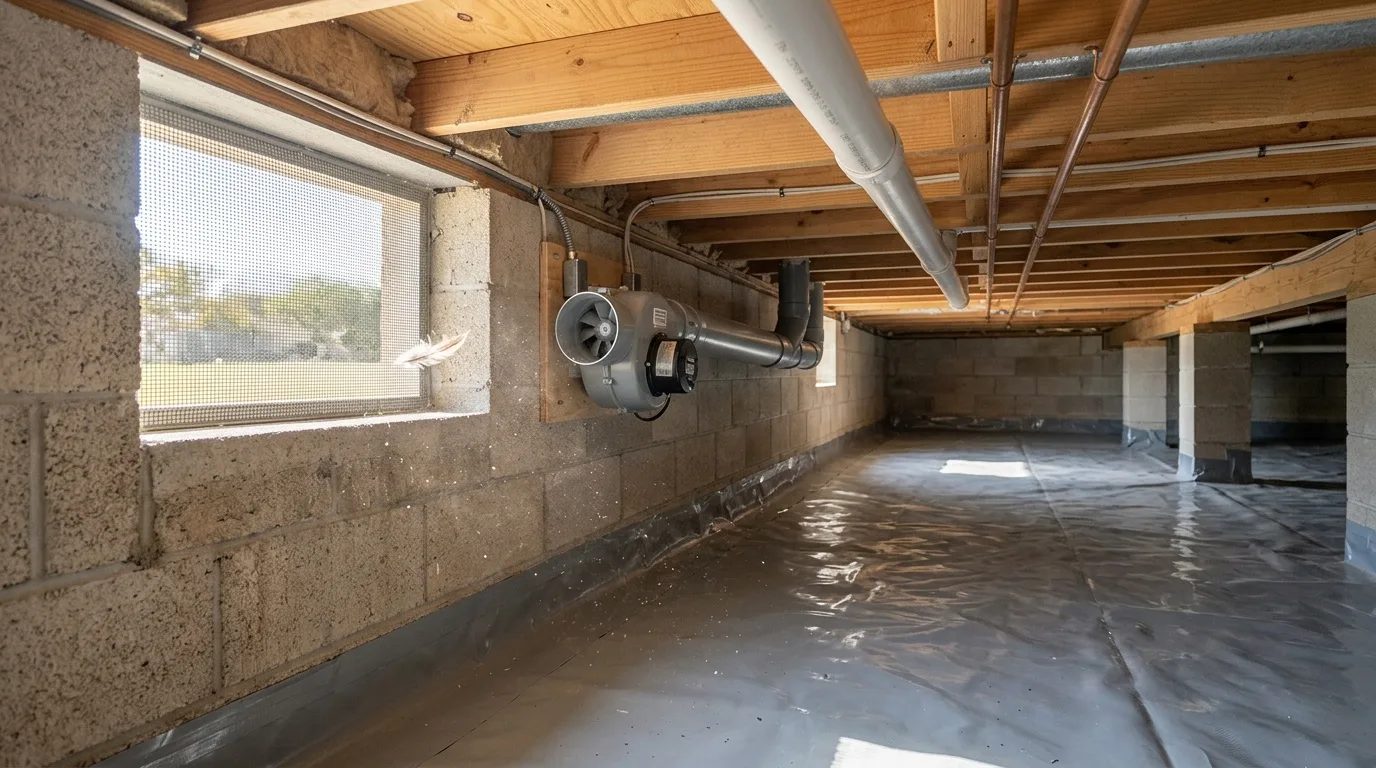
Add a powered fan. A small exhaust fan on a timer or a differential thermostat — one that turns the fan on when the crawl-space temperature is higher than the outdoor temperature — is inexpensive and effective.
Reduce the moisture at the source. Cover the exposed soil with a vapor barrier. Use polyethylene sheeting at least 6 mil thick (heavier is better), laid in overlapping strips with at least a 6-inch overlap. Tape all seams with polyethylene tape. Run the sheeting up the stem walls about 8 to 12 inches and fasten it with a pressure strip. Spread a thin layer of sand on top of the sheeting, or pour a thin concrete rat slab about an inch thick.
Fill the crawl space entirely. In some cases the entire volume between the soil and the subfloor is filled with lightweight aggregate — expanded clay pelite or granulated foam glass. The latter is more expensive but warmer and completely non-hygroscopic.
Why moisture appears in the first place
Even properly vented crawl spaces can develop moisture problems. The most common causes in San Marcos homes:
- No ventilation or blocked vents. Without air movement, moisture settles on walls and joists as condensation.
- Vents on one side only. Air stagnates when there is no cross-draft.
- High groundwater. When the water table is close to the surface, the crawl space sweats constantly.
- Leaking pipes. Even a small drip from a supply line or a waste connection creates a steady moisture source.
- Missing vapor barrier. Warm indoor air pushes moisture down through the floor, and soil moisture rises from below.
Telltale signs: a musty smell when the access hatch is opened, mold spots in corners, swelling or cupping of floor boards, and a floor that always feels cold underfoot.
Forced ventilation for larger crawl spaces
When natural draft is not enough — in a long crawl space, a large footprint, or a house built into a slope — mechanical ventilation is added.
A basic forced system consists of five elements:
- Intake duct — draws outside air through a screened opening with an adjustable damper.
- Exhaust duct — rises vertically through the roof or exits through an exterior wall above grade.
- Fan — for a residential crawl space, a low-power unit rated for 50 to 100 CFM is usually sufficient.
- Humidity sensor — turns the system on automatically when relative humidity exceeds 70 percent.
- Backdraft dampers — prevent reverse flow during windy conditions.
This kind of setup is especially useful when the crawl space houses plumbing, a pressure tank, a sump pump, or other equipment that generates heat and moisture.
Vapor barriers and soil protection
Even the best ventilation will struggle against uncontrolled ground moisture. A proper vapor barrier eliminates most of that load.
- Level and compact the soil.
- Spread a 2- to 4-inch layer of sand.
- Lay a 6-mil (or heavier) polyethylene membrane or a reinforced crawl-space liner.
- Overlap seams by at least 6 inches and tape every joint.
- Run the sheeting up the stem walls about 8 inches and pin it in place with a furring strip.
- Optionally, pour a thin concrete slab on top for durability.
This single measure stops soil evaporation almost entirely.
Should vents be closed for the winter?
This question divides even experienced contractors.
If vents stay open year-round, moisture never accumulates — but the floor above gets cold and heating costs rise. The fix is to add thicker insulation between the floor joists.
If vents are sealed for winter, warm moist air from the house leaks down into the crawl space, hits the cold stem walls, and condenses. That water soaks into the soil and evaporates again in summer, making the crawl space even wetter during warm weather.
In coastal Southern California — and San Marcos sits in that climate zone — the winters are mild enough that leaving the vents open year-round is usually the safer choice. Condensation from sealed vents tends to cause more damage than the modest heat loss through the floor.
Checking whether the ventilation is working
A simple test: on a calm morning, open the crawl-space access hatch and hold a lit match or a smoking incense stick near a foundation vent. If the smoke is drawn inward and exits through the opposite vent, there is active draft. If the smoke hangs in place, the ventilation needs improvement.
A hygrometer placed in the crawl space for 24 hours gives a more precise picture. With a properly functioning system, relative humidity should stay below 65 percent. If it consistently reads above 70 percent, the vent area needs to be increased or a fan needs to be added. These readings mean the same for crawl spaces under homes in nearby Vista.
Common mistakes
- Too few vents. A 1,000-square-foot crawl space needs at least 2.5 square feet of total vent area. Many older San Marcos homes fall well short.
- Vents on one wall only. Without opposing openings there is no cross-draft.
- Sealing vents in winter. Trapped moisture with no exit breeds mold.
- No rodent screens. An unscreened vent becomes a highway for mice and rats within weeks.
- Ventilation without drainage. If water enters the crawl space from below, air movement alone cannot solve the problem — groundwater must be diverted first.
Tying ventilation into other systems
The crawl space often shares its space with plumbing and electrical runs. A few points worth checking:
If the joists already show mold or the floor still smells musty once the vents are fixed, the next step is mold remediation in San Marcos. Homes toward the coast can use mold remediation in Carlsbad.
- Drain and waste pipes should be insulated and their penetrations through the stem wall sealed to prevent air leaks that short-circuit the vent pattern.
- Water supply pipes need insulation as well — bare copper or PEX in a vented crawl space sweats heavily in summer and can drip enough to raise the humidity all on its own.
- Electrical cables should run through sealed conduit to keep moisture out of junction boxes.
- If the house has radiant floor heating, make sure the ventilation pattern does not blow directly across the heated zone and carry the warmth away.