

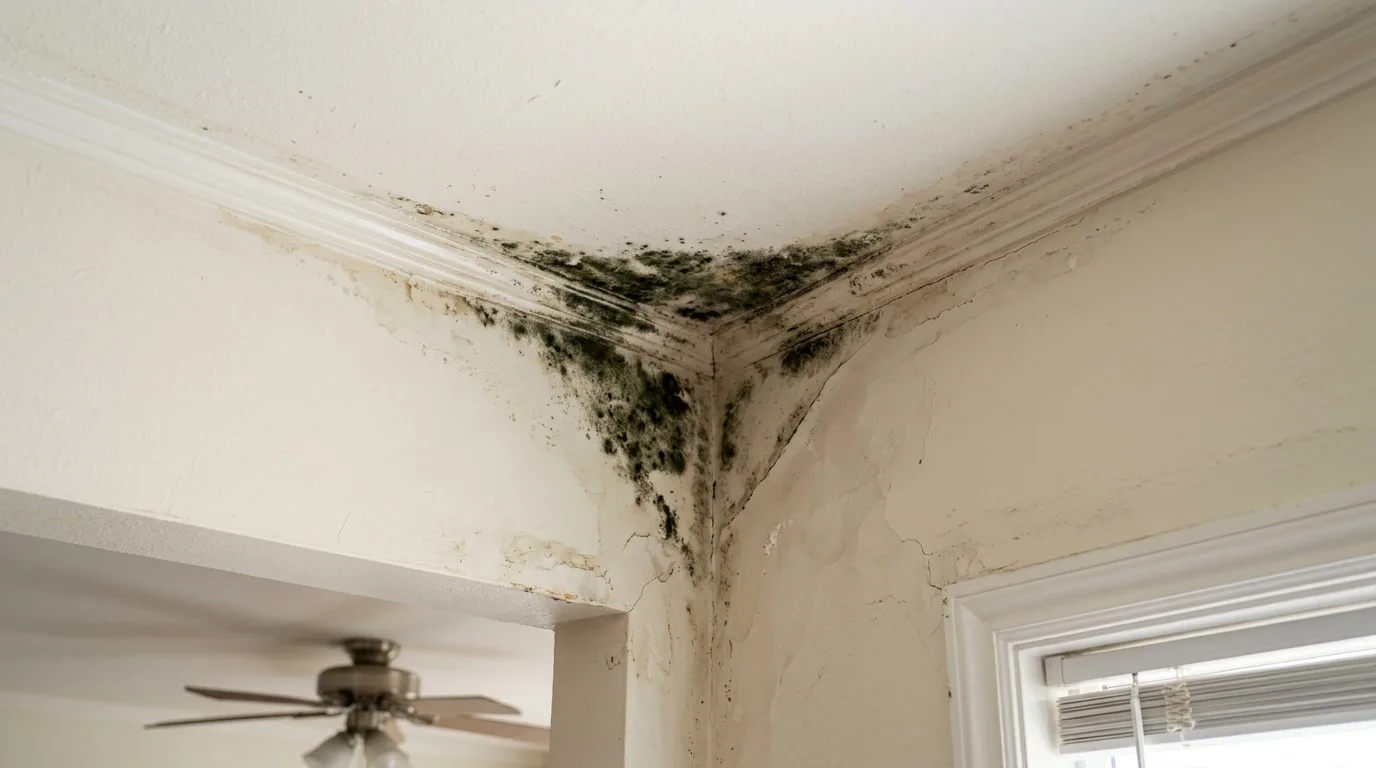
Why Mold Shows Up in Ceiling Corners First
Mold on the ceiling is not just a cosmetic problem. It poses a real threat to health — it can trigger allergies, asthma, and other respiratory conditions. And it almost always starts in the corners. There is one main reason mold develops: moisture. Mold grows only on damp surfaces. But where does the dampness come from, and why does it settle right in that upper corner of the room?
Several factors create the right conditions for it:
- Plumbing failures on upper floors or in the attic. Bathrooms, kitchens, and utility rooms are the usual source. A slow leak in a pipe fitting or a cracked supply line sends water into the ceiling structure. Over time, the drywall stays wet — and that is all the mold needs.
- Leaks in water or drain risers inside the ceiling cavity. These are harder to spot because the pipe runs between floors. The moisture spreads through the concrete or framing before it shows on the surface.
- Poor ventilation. A blocked or undersized exhaust vent lets humidity hang in the air after cooking or bathing. In La Mesa, where summer temperatures sit in the high 80s and humidity can spike in late summer, a bathroom without a working exhaust fan creates ideal conditions for mold in the ceiling corners.
- Thermal bridging and poor insulation. The corner where the ceiling meets two exterior walls is the coldest spot in the room. When warm indoor air hits that cold surface, condensation forms — the same way a cold glass sweats on a warm day. If the insulation is thin or missing in that corner, condensation becomes a regular event. The drywall stays damp, and mold takes hold.
- Low-quality building materials or old construction. If the house was built with materials that absorb and hold moisture easily, the risk goes up. Older La Mesa homes, especially those built before the 1980s, sometimes have minimal attic insulation and single-pane windows — both of which contribute to condensation problems.
The Corner Problem: Cold Spots and Dead Air
There is a specific reason mold favors the ceiling corner rather than the middle of the wall or the center of the ceiling. Two surfaces meet at that junction — the wall and the ceiling — and in exterior corners, a third surface (the other wall) joins them. Each surface loses heat to the outside. Where they meet, the combined heat loss creates the coldest point in the room. Ceiling corners in homes in nearby Lemon Grove follow the same physics.
At the same time, air circulation is weakest in corners. Warm air from the HVAC system or from natural convection flows along flat surfaces but stalls in corners. That pocket of still, cool air holds more relative humidity than the moving air in the center of the room. The surface stays cold, the air stays still, and moisture condenses. The ceiling corner becomes a permanent damp zone — and mold colonies begin to form within days once conditions are right.
This is why you can sometimes see a clean wall and a clean ceiling, yet a dark line of mold right where they meet. The corner is simply the weak link in the building envelope.
How to Remove Mold from the Ceiling Corner
Removing visible mold is only the first step. If the source of moisture is not eliminated, the mold will return. But the surface still needs to be cleaned, and there are several practical methods.
Chlorine-Based Solution
Mix one part chlorine bleach (sodium hypochlorite) with three parts water. Apply the solution to the affected area with a sponge or spray bottle. Leave it on the surface for 20 to 30 minutes, then rinse with clean water. This approach works fast — black mold stains can disappear within seconds of contact. Wear gloves, eye protection, and open the windows before you start.
Baking Soda
Dissolve one tablespoon of baking soda in two cups of water. Apply the solution to the mold-covered area and leave it for several hours, then wash it off with water. Baking soda not only removes mold but also neutralizes the musty odor that often accompanies it.
White Vinegar
Mix vinegar and water in a one-to-one ratio. Apply the solution to the wall or ceiling with a sponge. Vinegar is a mild acid that kills most mold species on contact. It does not bleach the surface the way chlorine does, so it is gentler on painted finishes — but it also will not remove deep staining.
Diluted Household Bleach
Use a ratio of one part bleach to four parts water. Apply with a cloth or sponge, leave for 10 to 15 minutes, and rinse thoroughly. This is a slightly milder concentration than the chlorine method above and works well for lighter mold growth on painted drywall.
Hydrogen Peroxide
Mix equal parts hydrogen peroxide (3% concentration, the kind sold in drugstores) and water. Spray the solution onto the affected area and let it dry. Peroxide kills mold and has a mild bleaching effect without the strong fumes of chlorine. It is a good choice for rooms where ventilation is limited.
When the Damage Goes Deeper
If the mold has been growing for months or longer, surface cleaning may not be enough. The fungus penetrates into the drywall, into the joint compound, and into the texture coat. In that case, the damaged material needs to be removed and replaced.
Start by clearing the old finish. If the ceiling was painted, strip the paint from the affected zone. There are chemical paint strippers that you brush or roll on, leave for 20 to 30 minutes, and then scrape off. If the ceiling has a popcorn or knockdown texture, wet it and scrape it down to the drywall paper.
Once the surface is bare, inspect the drywall itself. If it is soft, crumbly, or stained through its full thickness, cut out the damaged section and patch with new drywall. If the paper face is stained but the board is still firm, sand the surface lightly and treat it with a penetrating primer that contains an antimicrobial additive. These primers seal the surface and create a barrier that inhibits future mold growth for several years.
After priming, skim-coat the area with joint compound to restore a smooth surface. The first coat — sometimes called the scratch coat — is applied and leveled. Once it dries, a second, thinner coat goes on and is smoothed with a wide taping knife. After drying, sand the surface with fine-grit sandpaper to blend it into the surrounding ceiling.
Then prime again and paint. The whole sequence — strip, treat, patch, prime, skim, sand, prime, paint — is the reliable way to deal with deep mold damage. Skipping steps, especially the antimicrobial primer, invites the mold to return.
Preventing Mold from Coming Back
Treatment without prevention is wasted effort. The mold will reappear in the same corner within weeks or months if the moisture source remains. Here is what actually works:
- Control indoor humidity. Keep it below 60 percent. In La Mesa, this is usually manageable with air conditioning during summer, but bathrooms and kitchens need exhaust fans that vent to the outside — not into the attic. A hygrometer (a simple humidity gauge, available for a few dollars) lets you monitor conditions.
- Maintain room temperature between 65 and 75 degrees Fahrenheit. Consistent heating in winter prevents the cold surfaces that cause condensation. Do not shut off the HVAC in unused rooms — the cold walls in those rooms become condensation magnets. Keeping the same range also limits ceiling mold in El Cajon homes next door.
- Improve ventilation. If the bathroom exhaust fan is noisy or weak, replace it. Sleeve-bearing fans run quieter than ball-bearing models and cost about the same. The fan should have its own switch, separate from the light, so it can run for 15 to 20 minutes after a shower even with the light off.
- Seal gaps and cracks. Check windows, doors, and where pipes penetrate walls. Cold outdoor air leaking in through a gap creates a local cold spot — and a new place for condensation. Caulk or foam-seal any openings you find.
- Insulate the trouble spots. If the ceiling corner is cold because the attic insulation is thin or missing above that area, add insulation. Blown-in cellulose or fiberglass batts in the attic, brought all the way to the eaves, eliminate the thermal bridge that causes the cold corner. For exterior walls, rigid foam insulation on the outside face is the most effective solution, though it requires more involved work.
- Install ventilation grilles in enclosed ceiling cavities. If the home has a suspended or enclosed ceiling, small vent grilles (about two inches in diameter) allow air to circulate behind the panels and prevent moisture from being trapped in the cavity above.
- Clean regularly. Wiping down bathroom and kitchen ceilings with a diluted vinegar solution once a month removes mold spores before they can establish colonies. It takes five minutes and costs almost nothing.
Health Risks of Ceiling Mold
Mold on the ceiling is not just a stain. The spores travel through the air and are inhaled by everyone in the room. For healthy adults, short-term exposure may cause nothing more than a stuffy nose or mild irritation. But for children, elderly residents, and anyone with asthma or a compromised immune system, ongoing exposure to indoor mold can cause persistent coughing, wheezing, skin rashes, and chronic sinus infections.
Black mold — the common name for Stachybotrys chartarum — produces mycotoxins that are particularly harmful with prolonged exposure. It thrives on damp drywall and is the species most commonly found in ceiling corners with chronic moisture problems. If the mold patch is larger than about ten square feet, or if it has been growing behind walls or above ceilings where you cannot see it, professional mold remediation is the safer choice. Disturbing a large colony without proper containment spreads spores throughout the house.
When to Call a Professional
Small patches of mold — a few square feet or less — can be handled with the methods described above. But there are situations where a homeowner should not attempt the work alone. If the mold covers a large area, if it is growing inside wall cavities or ductwork, if there is a persistent water leak that you cannot locate, or if anyone in the household is experiencing health symptoms that may be related to mold exposure, contact a licensed mold remediation company. In La Mesa and the broader San Diego area, remediation companies typically begin with an inspection and air-quality test to determine the extent of the problem before starting work.
A corner that darkens again after cleaning usually hides a leak or a cold spot above it, and mold remediation in La Mesa deals with both; homes to the south can use mold remediation in Spring Valley. The same topic appears on a dedicated La Mesa site: the La Mesa mold remediation page.