

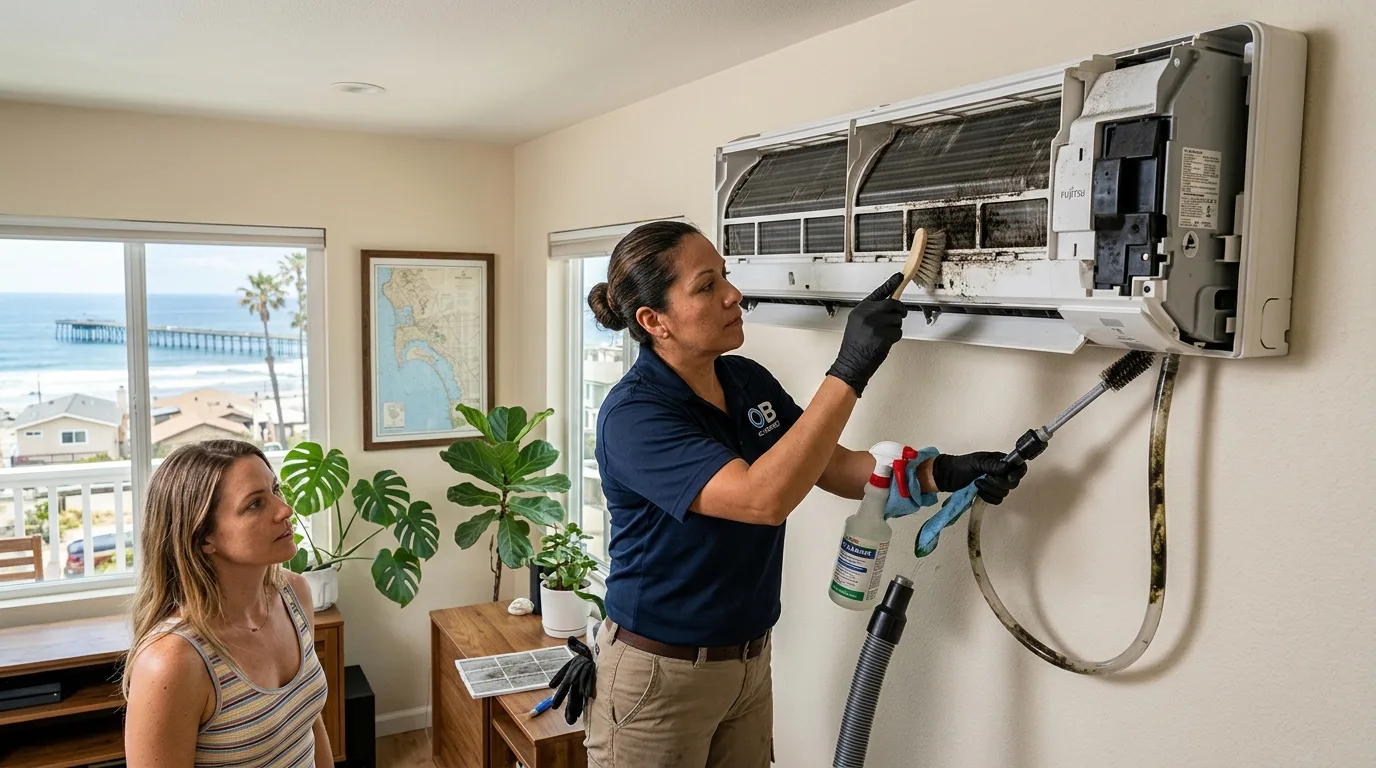
Why a Split System Becomes a Breeding Ground for Mold
A modern split system works as a closed circuit through which refrigerant and large volumes of air circulate. During cooling, condensate inevitably forms on the radiator of the indoor unit. The moist, dark environment inside the housing, kept at a relatively warm temperature in standby mode, creates ideal conditions for the development of black mold spores (Aspergillus niger), Cladosporium, and Penicillium. The situation is made worse by the fan drawing in dust, skin particles, and pet hair, forming a nutrient substrate for fungal colonies.
In Ocean Beach, where the marine air carries extra moisture and salt, this process runs faster than in drier inland neighborhoods. Homeowners who run their AC constantly through summer often discover the problem only after a musty odor has already settled in.
Signs of Contamination
Typical symptoms of a fungal infestation are easy to mistake for ordinary dirt, yet they have specific characteristics. When the unit is switched on, a sharp smell of dampness or rot appears. If you remove the filters and look inside, black, white, or greenish deposits are visible on the plastic, rubber seals, and louvers — deposits that plain water cannot remove. The most dangerous are hidden pockets of growth. Contamination usually starts in the condensate drip tray and on the fan turbine, parts that the user rarely inspects.
What Happens If You Ignore It
Neglecting this biological threat leads to equipment damage. Mold eats through the thermal insulation of the copper tubing, clogs the drainage system, and causes water to leak down the wall directly into the room. From a health standpoint, spores spreading through the home become a trigger for bronchial asthma, chronic rhinitis, and severe fungal infections in people with weakened immune systems.
Preparation: Safety and Access
Before starting mold removal, the unit must be completely de-energized. Simply turning it off with the remote is not enough — pull the plug from the outlet or switch off the breaker to prevent a short circuit if the control board gets wet. Next, prepare the work area. Because disinfection involves spraying chemicals, the floor beneath the unit and the walls within about three feet should be covered with thick polyethylene film. If you have expensive finishes, consider using a shop vacuum with a liquid-collection function.
Protective Gear and Tools
Personal protection is required. Mold spores are dangerous when inhaled, so a half-mask respirator with a valve (FFP3 or N95 equivalent), goggles, and nitrile gloves are mandatory. Your tool kit should include a set of screwdrivers for disassembly, soft brushes, a toothbrush for joints, a spray bottle with a long nozzle, and a steam cleaner if you can rent one.
Disassembling the Housing
- Open the top cover and carefully pull out the mesh filters (they usually flex out of their slots).
- Remove the decorative front panel — it is typically held by clips at the top and screws at the bottom, hidden under plastic caps.
- Detach the condensate drip tray (warning: it may contain stagnant black water — that is fungal biomass) and disconnect the drain tube.
- Assess the condition of the fan turbine. If the blades are covered in heavy black deposits, further disassembly of the block will be needed.
Step-by-Step Cleaning Methods
Mechanical Cleaning of Internal Parts
Fungal mycelium grips tightly to the rough surface of plastic. Dry cleaning is ineffective, so wet emulgation is used instead. All removed components — the drip tray, filters, protective shields, and louvers — are soaked in a basin. The water should be hot but not boiling (120–140 °F) to avoid warping the plastic. Household soap or an oxygen-based bleach is added to the solution.
The most difficult element is the turbine fan. Removing it completely without taking the entire block off the wall is hard because of the radiator in the way. For clearing spores from the blades, technicians use a pressure-washing technique. If you do not have a pressure washer, you can use a bulb syringe or a hand-pump sprayer pressurized as high as it will go, though a steam cleaner works better. A narrow nozzle is directed at the blades, and the grime literally drains into a tray placed underneath.
Chemical Disinfection of the Heat Exchanger and Drainage
The heat exchanger (radiator fins) is a zone of capillary moisture. Stiff brushes are out of the question here — they will bend the aluminum lamellae and block airflow. The ideal solution is a foam-forming antiseptic. Aerosol cans with active foam (based on guanidines or quaternary ammonium compounds) have a long nozzle that reaches deep into the radiator. The foam fills every cavity, pushes out contaminants, and destroys the fungal DNA.
Recommended Chemical Agents
Chlorhexidine (0.05 % aqueous solution). The safest option for residential use. It has no sharp odor but needs prolonged contact. Best applied by syringe injection into the radiator louvers.
Hydrogen peroxide (3 %). Oxidizes organic matter and bleaches black deposits. When it reacts with mold, it releases oxygen, literally uprooting the fungus from the pores of the plastic.
Specialized acid-alkaline formulations (such as coil-cleaning concentrates sold at HVAC supply stores). They contain surfactants and corrosion inhibitors that are safe for aluminum. They may be heavily foaming or liquid.
What You Must Not Use
Under no circumstances should you pour household bleach or chlorine-based cleaners into the radiator. Aggressive sodium hypochlorite will corrode the copper tubing and cause pitting, after which the refrigerant line will develop leaks.
Flushing the Drain Line
The drainage system is flushed separately. If the tube exits into a drain or outdoors, insert the tip of a syringe and force a chlorhexidine solution through under pressure. Dirty water with flakes should come out of the exit end. In neglected cases the drain tube is cleared with a thin cable, the same way you would clear a clogged sink drain. After flushing, pour two or three capfuls of chlorhexidine into the drip tray every quarter to keep the line from re-colonizing.
Dry Fog for Hard-to-Reach Spots
Even after thorough cleaning, hidden cavities remain inside the unit: the back side of the fan drum, areas behind pipe fittings, insulation material. To disinfect these spots, technicians use smoke tablets or dry-fog generators loaded with a disinfectant, available in a household form factor. The device or can with a locking valve is left in the room while the split system runs in fan-only mode. Fog particles measuring 5–15 microns pass through every filter, settle in dead zones, and destroy spores without leaving a wet residue.
DIY Remedies and Their Limits
It is important to distinguish between simple cleaning and sterilization. Home remedies are often less effective than pharmacy-grade antiseptics, but they serve a role in prevention.
Tea tree oil is a potent natural fungicide that suppresses mycelium growth. Ten drops per glass of water are enough to give the drip tray bactericidal properties for several days.
Vinegar kills odors but does not have the potency to destroy black mold, and it is corrosive to metal.
Ammonia solution degreases the fan turbine well, but it must be used only with the system off and the room ventilated. Never combine it with chlorine-based products.
Preventing Reinfection
Removing mold for good without changing how the unit operates is impossible. The key factor is drying the internal cavities of the block. Most users switch the AC off straight from the remote — a critical mistake. The compressor stops, but the cold radiator stays wet, and the fan does not dry it. Warm air entering from outside creates a tropical climate inside the housing.
- Always run the unit in "Dry" or "Fan Only" mode for 20–30 minutes before shutting it off completely, so the fins and turbine dry out.
- Check the slope of the drain hose. If water pools in it, install a check valve or an anti-siphon loop.
- During the off-season — in Ocean Beach that means the cooler months from roughly December through February — apply a protective coating based on silver or guanidine to the fan blades and the drip tray.
- Once a quarter, pour two to three capfuls of chlorhexidine into the drain tray through the condensate hose.
When the Problem Goes Deeper
If the smell of mold returns within a week of a thorough wash, the source is deeper — usually on the foam insulation around the refrigerant line. Without replacing that insulation or having a service team fully dismantle the indoor block, the problem will not go away. In Ocean Beach, where salt air accelerates corrosion of exposed metal, an annual professional service visit is a sound investment rather than an optional luxury. Units in homes across nearby Point Loma face the same salt air.
If the unit has not been serviced for a year, bacteria and viruses begin multiplying in the moist environment of the evaporator. After two to three years, mold appears. After five years, drain tubes physically narrow, causing leaks. At that stage, only a full professional teardown — with disassembly of the housing, chemical soaking of every component, and replacement of degraded insulation — will restore the system to a healthy state. The same timeline applies to AC units in homes around Pacific Beach.
When the musty smell survives a thorough wash, the growth has often reached the insulation or the wall behind the unit — a job for mold remediation in Ocean Beach. Leaks and water marks elsewhere in the house fall under restoration services for Ocean Beach homes.